It's random, lovely, full of misspelled words and terrible punctuation. It's about me, Erin, my family and friends, in real life. There's sugar but no sugar coating.
"Come what may, and love it!......Yet in spite of discouragement and adversity, those who are happiest seem to have a way of learning from difficult times, becoming stronger, wiser, and happier as a result." ~ Elder Joseph B. Wirthlin
Found this site yesterday.
I have only tried the bread so far but the other recipes look just as good.
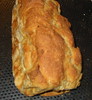
SERIOUSLY GOOD BREAD!
Ingredients
1 3/4 cup gf flour (amaranth, sorghum, and millet all work well here)
1 cup arrowroot, tapioca, or corn starch (potato starch tends to make it fall)
2 TBS sugar
2 1/2 tsp xanthan gum or guar gum
2 tsp yeast
1 cup water (110 degrees)
1 1/4 t salt
2 t apple cider vinegar
2 T olive oil
3 eggs
parchment paper
Method
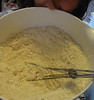
Whip together the 3 eggs in your stand mixer.
While they are whipping, combine the dry ingredients in a bowl, and whisk together.
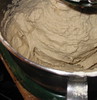
Add the rest of the wet ingredients to the eggs, mix together. Slowly add the dry ingredients, beating together on low. “Knead” for 4 minutes. The dough will be very wet, almost like cake batter.
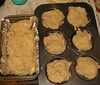
Line a 9×5 (or so) bread pan with parchment or Reynolds Release (or grease your hamburger pan). Use a spatula to fill the bread pan with the dough/batter.
Let rise in a warm place for 1 hour.
Bake at 350 for 30-45 minutes, until golden brown. Remove from pan and cool (it cuts much better cooled if you can wait that long).
If you are going to save the bread, slice it once it is cooled, then place a piece of wax paper between the slices and freeze. Toast it straight from the freezer to warm it up.
We ate pretty much the entire loaf eating grilled cheese sandwiches. That's never happened with gluten-free bread around here. Heath even asked me why I didn't make two loaves. Seriously, yum!
"The greatest events that have been spoken of by all the Holy Prophets will come along so naturally as the consequences of certain causes, that unless our eyes are enlightened by the Spirit of God, and the spirit of revelation rests upon us, we will fail to see that these are the events predicted by the Holy Prophets." - George Q. Cannon
I would dare to say that some of those events are taking place. As my dad would say, "If I'm right you'll be prepared to feed your family and take care of them and if I'm wrong you'll still have peace of mind."
I'm getting excited just starting to write about this. I think that's why I call myself an emergency prep. geek. Also, when we moved I couldn't find my grinder and I admit that I did freak out (a little).
OK, a few people have asked me how I would suggest getting started with food storage and preparedness.
Well, the first thing I would suggest is start NOW, RIGHT THIS SECOND! Reading this post is a good start :)
Whether it's grabbing extra canned goods at the grocery store next time you go shopping or looking up things that might be important to you if something did happen.
Start a notebook and print and collect information that you are interested in.
Look at the things you eat. If your family likes ketchup, stock up. If you cook with a lot of a certain seasoning, stock up.
Look at local sales and use coupons. I look to see what's on sale for the week and then I buy multiple coupons at www.thecouponclippers.com and on www.ebay.com. I just got a ton of vanilla for $1.
Think about things like toilet paper, toothpaste, diapers, tampons. Things you wouldn't want to go without. Again, use coupons.
Use the cannery for The Church of Jesus Christ of Latter-Day Saints. These are going to be the best prices for food canned and ready for long term storage. The basic things to store are wheat, powdered milk, oil, salt, honey or sugar, and water. If you add a few extras like yeast, baking powder, powdered eggs, and baking soda the list of things you can make will grow tremendously.
Start with a variety. Don't just buy all your wheat first because if something happens before you can get everything, you're going to be stuck eating just wheat. Bet it wouldn't take you long to realize you'd rather not eat than eat wheat AGAIN.
One thing that is easy to get a year supply of for cheap is salt.
Baking soda is a great thing to store. You can use it in baking, brushing your teeth, as deodorant, as a cleaning agent, to wash your face, etc
The best thing I can tell you is try to focus on something and NOT FEEL SO OVERWHELMED THAT YOU DO NOTHING AT ALL. Let the thought of your starving children, spouse, family be your motivation. That was mine.
Start storing small amounts of water. Everyday preparation will have great benefits.
I would for sure start planning for a spring garden now. Make preparations on how big you want your garden, what your going to grow, etc. This is a good book from the church that I think will help you A LOT. $1.50 well spent.
Then I would suggest looking in to how you can store what you grow. Learn how to water bath can and pressure can. This all takes time. Don't be overwhelmed, talk to your grandma, and have fun. Not to mention you'll know exactly where your food came from and what's on it.
I figured when I started that this would be lengthy. I will post again. But this is a starting point. Good luck!
Allergies are on the rise. As you know we are gluten-free.
Just wanted to share some of the best info I have found on being gluten free.
Go HERE for great information.
This tells you all the gluten-free grains and compares them nutritionally to wheat.
If you have an egg allergy, here's some good info for you.
Egg Replacer Options:
To replace eggs in baking recipes you have several options, each of these options makes the equivalent of 2 eggs in baking: 1/2 cup applesauce + an additional 1/2 teaspoon of baking powder OR 2 tablespoons ground flax seeds + 6 tablespoons hot water + an additional 1/2 teaspoon of baking powder OR 1 tablespoon of Ener-G Egg replacer + 4 tablespoons hot water. I also think it's a good idea to add an additional tablespoon of oil per egg to replace the fat/moisture content from the egg yolk!
“Eggs” from unflavored gelatin (Knox): The gelatin is less expensive than powdered eggs (as little as 3 cents per tsp) and has an indefinite shelf life.
Making one egg: Combine 1 tsp of unflavored gelatin with 3 Tb of cold water and stir until dissolved. Then add 2 Tb of hot water and stir. When using your own recipes, decrease the liquid called for in your recipe by about ¼ cup to compensate for the added water from the “egg”.
Eggs: Storing fresh eggs for up to 1 year. Rub warmed mineral oil on your hands and coat the entire surface of the fresh egg with the oil. Replace egg in carton with the point down. In cold climates they can be stored in a cool, dark place. In warmer climates, place in the refrigerator. Rotate once a year. (This is taken from Wendy DeWitt's "Everything Under The Sun" handout which you can get in it's entirety by emailing her. This is her blog (her email address is there.) It's a great emergency prep handout.
Store some of these things in your food storage.
You can store gluten-free grains like you do other grains. Store in #10 cans or buckets with oxygen absorbers. They don't store as long as wheat but should store for a good 10 years or so.
If you are gluten-free it's A TON CHEAPER to grind your own grains than purchase the flour.
You want your grains to be hulled unless you plan on doing the hulling yourself which is a process.
And finally Milk allergies.
For storing milk they do make powdered soy milk and powered coconut milk. You could store nuts to make nut milk. Of coarse, these are all more expensive. sorry!
Anyway, it's true that Asher gained a pound. Yes! Also, true that my dad owns a tattoo gun. BUT also true that it's for using on goats.
This is about my soap. I don't want there to be confusion.
Saponification is the chemical reaction that occurs when fats or oils (fatty acids) come into contact with lye (a base.) Saponification literally means "soap making" from the root word, "sapo", which is Latin for soap. The by-products of the saponification reaction are glycerin and soap. (about.com)
With that said, I did use lye to make the soap (all REAL soap is made using lye) but most will list a "saponified oil" in the ingredients instead of lye. I'll tell you why. Oils and fats have what is called a “saponification value”, which is the amount of lye needed to completely neutralize them into soap with no lye left over. My soap is "superfatted" by 5% (which means I will always have a little more fat than lye) which means all the lye will always be completely neutralize plus some. The end product contains no lye because it chemically reacted and turned into soap.
So, no lie, I did use lye. If you wanna make soap you have to.
You do have to make sure you check all your recipes in a lye calculator so that you will have enough of each ingredients to neutralize the lye.
Anyway, there's a little soap education for you. I feel better now.
So, I'm making soap.
The first batch didn't really turn out that well. (I'll spare you the pictures)
but this second batch, awesooooooooome! If I do say so myself.
I'm a little excited.
Sorry, still using the webcam. Not sure when I'll get another camera so maybe get used to the blur for now.
The only ingredients in this soap: Saponified coconut and olive oil.
honey, cherry almond 100 % essential oil
parsley powder for a little color (I was going for a kind of a swirly affect)
water
no lie!
Anyway, look for my soap at a retailer near you. Just Kidding!
The only place you'll be able to find this stuff is in my kitchen for now.
He's a Grad student. He makes pots. He likes hunting and hanging out with his boys. You can visit his blog at www.checkoutmyblogatmyblog.blogspot.com (or click the picture).
"We artist are indestructible, even in a prison cell or a concentration camp I would be almighty in my own world of art. Even if I had to paint my pictures with my wet tongue on the dusty floor of my cell." - Pablo Picasso
Asher helps me develop faith. He has a nerve injury on his right arm. He also has trouble gaining weight. He sees an occupational therapist 2 times a week. He is sweet and shy but has a funny personality.
this is our story.
i called him. he said yes. he kissed me. i said, "i love you." he said, "i like you twelve." (that equals i love you.) he said "will you?" i said, "yes". we got married. he started school. we had noah. i became a mom. he became an artist. we moved to pa. he became a grad student. then came asher and i became the mom of 2. we moved back to utah. he became a teacher. me? the mom of three. we are happy. we are blessed.
Children are made readers on the laps of their parents. - Emily Buchwald